
Notice
Recent Posts
Recent Comments
Link
total_activ
LM75B - EMIO FPGA (3) 본문
Vivado
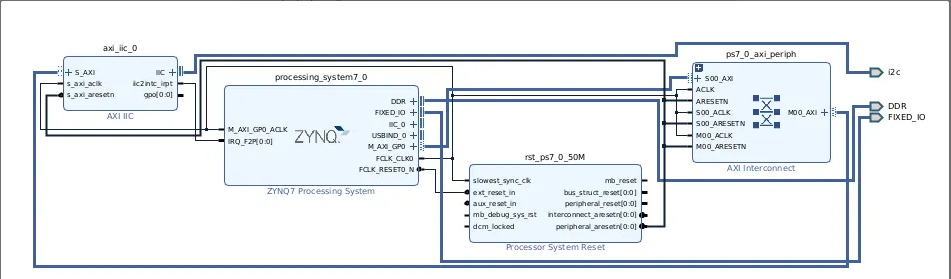
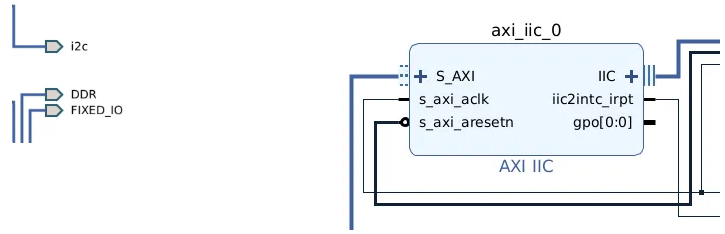
1) 전체적인 블록 다이어그램
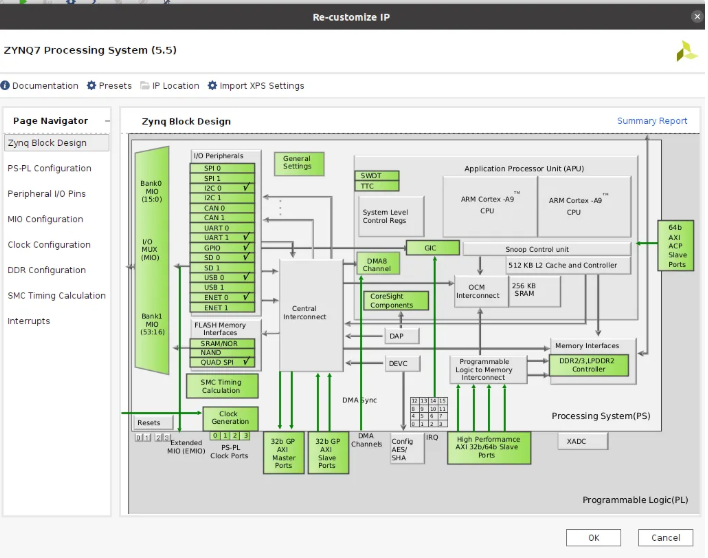
2) Zybo 설정


3) wrapper

4) .XDC (pmod로 직접 i2c 핀을 할당함)
set_property -dict { PACKAGE_PIN V15 IOSTANDARD LVCMOS33 } [get_ports { i2c_scl_io }]; # PMOD JC1
set_property -dict { PACKAGE_PIN W15 IOSTANDARD LVCMOS33 } [get_ports { i2c_sda_io  }]; # PMOD JC2
set_property PULLUP true [get_ports { i2c_scl_io }]
set_property PULLUP true [get_ports { i2c_sda_io }]- V15 : 핀 1
- W15 : 핀2
- 주의 할점: wrapper에서의 i2c pmod와 이름을 동일하게 설정할것
Petalinux로 연동하는 과정
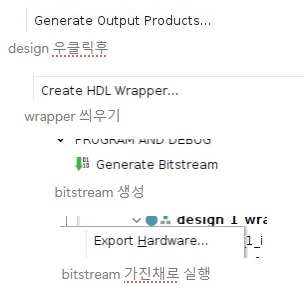
1) XSA 내보내기 - vivado 마무리
Vivado에서:
- File → Export → Export Hardware (☑ Include Bitstream) → .xsa 생성 경로 확인.
2) PetaLinux 프로젝트 준비
추천 경로: 이 밑에다가 하나 디렉토리 만들기
admin$ cd /xilinx/2022/petalinux/
admin$ ls
i2c  spi_linux
호스트 PC에서 (새 터미널마다 settings.sh 먼저):
source /tools/Xilinx/petalinux/settings.sh
petalinux-create --type project --template zynq --name i2c_temp
cd i2c_temp
petalinux-config --get-hw-description=/절대/경로/당신의_xsa_폴더
# 메뉴 뜨면 일단 Save & Exit
3) 커널에 I2C 드라이버 포함 (menuconfig)
petalinux-config -c kernel
메뉴에서 켤 것:
- I²C 서브시스템
- Device Drivers → I2C support → I2C support : [*] (CONFIG_I2C)
- Device Drivers → I2C support → I2C device interface : [*] (CONFIG_I2C_CHARDEV)
- → /dev/i2c-* 생김(디버깅, i2c-tools용)
- I²C 컨트롤러 드라이버(보드에 맞게 하나 선택)
- AXI IIC IP 사용 시:
- Device Drivers → I2C support → I2C Hardware Bus support → Xilinx I2C Controller : [*] (CONFIG_I2C_XILINX)
- PS I2C(캐던스) 사용 시(만약 PS 쪽을 쓴다면):
- … → Cadence I2C Controller : [*] (CONFIG_I2C_CADENCE)
- 하드웨어 모니터링(HWMON) + LM75 드라이버
- Device Drivers → Hardware Monitoring support : [*] (CONFIG_HWMON)
- 같은 메뉴 안에서 National Semiconductor LM75 and compatibles : [*] (CONFIG_SENSORS_LM75)
4) rootfs에 선택용 디버깅 포함
rootfs 쪽에서 i2c-tools 패키지
5)device tree
/xilinx/2022/petalinux/i2c/i2c_peta/project-spec/meta-user/recipes-bsp/device-tree/files/system-user.dtsi
/include/ "system-conf.dtsi"
/ {
    aliases { i2c1 = &axi_iic_0; };   /* 선택 */
};

&axi_iic_0 {
    status = "okay";
    clock-frequency = <100000>;
    #address-cells = <1>;
    #size-cells = <0>;

    /delete-property/ interrupt-parent;
    interrupt-parent = <&intc>;

    lm75@48 {
        compatible = "lm75";
        reg = <0x48>;
    };
};

&i2c0 { status = "disabled"; };
6) 빌드 & 산출물 배포
petalinux-build

petalinux-package --boot --fsbl images/linux/zynq_fsbl.elf --u-boot --fpga images/linux/system.bit --force

// sd카드 첫 번째 파티션에 옮김
cp BOOT.BIN boot.scr image.ub /media/user/2E28-0570/
sync;sync;sync
umoumt /media/user/2E28-0570/
7) petalinux에서 확인

- hwmon 밑에 내가 연결한 센서의 디바이스 폴더가 생김.
- 그중에서 센서값을 읽을수 있는 input 폴더 cat하면 확인 가능.
'임베디드 SW > FPGA' 카테고리의 다른 글
| 최종 BSP 통합 - LM75B/CAN/TCP/Serial/Audio (6) (0) | 2025.11.30 |
|---|---|
| LM75B I2C FPAG (2) - MIO (0) | 2025.11.30 |
| Zybo z7 10 내부 오디오 코덱 FPGA (5) (0) | 2025.11.30 |
| CAN FPAG (4) - LM75B + CAN + TCP BSP 1차 통합 (1) | 2025.11.29 |
| LCD FPGA (1) - 첫 전체 흐름 공부 (0) | 2025.11.29 |